Category: How-To

  • Using Folders in the Add TaskPaper Shortcut for OmniFocus

    I used Curt Clifton’s Populate Template Placeholders script in OmniFocus on my Mac a while back. I don’t know when or why this stopped working, but I assume it was when OmniFocus 4 came out. But rather than spend time troubleshooting it, I decided to switch my birthday reminder template to Apple Shortcuts. The benefit is that it works on all of my Apple devices. I have other templates that I also use and need to switch over.

    The Template Placeholders script, or Apple Shortcuts set to add something to OmniFocus, makes it simple to set up projects when you need them. This is ideal for birthdays where you want a project each year to sort out presents and a card for an individual without manually creating a project each time with the date and times of everything you want to do to prepare for that.

    Likewise, it is great for meetings where specific steps are needed before or after the meeting, such as emailing Zoom meeting details or booking a room, processing minutes and actions after the meeting, reminders, setting, etc.

    The shortcuts are not particularly challenging to create, although I ran into issues getting the project placed in the correct folder. It took a bit of research to find the correct syntax. I tried various methods such as deep links like omnifocus:///folder/gXBOjxW8JqA or folder names like Family/Birthdays. Neither of them worked. What I found was that the correct format is simply Family : Birthdays

    When running the shortcut, it now correctly places the project into the correct folder rather than dropping it in the inbox.

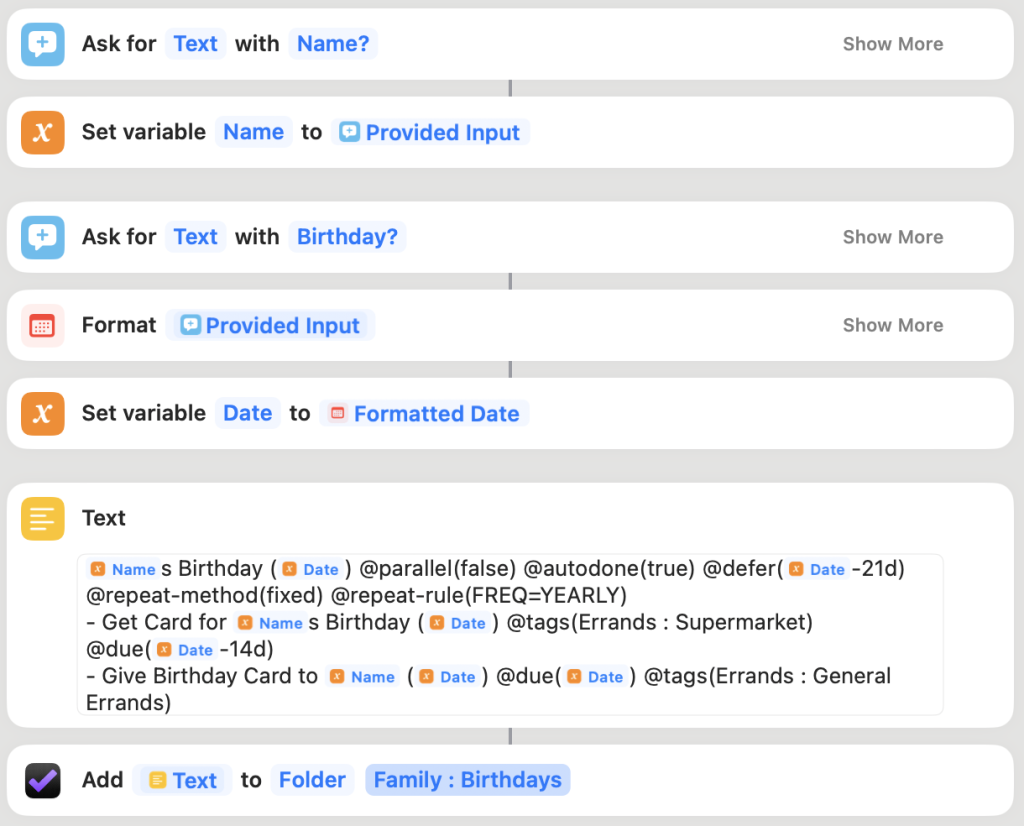
    You can see this in the screenshot below:

    Here is a quick summary of what is happening for those new to adding projects to OmniFocus with Apple Shortcuts.

    First, it prompts the user for the birthday person’s name. Then, it sets the provided input into a variable called Name.

    It asks for the birthday date. It formats the date into something more friendly (you can click “Show More” to see various options available) and then sets that formatted date to a variable called Date.

    The Text field contains TaskPaper format. Rather than creating the TaskPaper syntax myself, I manually build a project in OmniFocus and set all dates and notes precisely as I want (this is a sample project deleted when I have copied the task paper). I then select all items in the project, including the project name, and right-click and hit “Copy as TaskPaper”. I then paste this into the Text field and replace my fake names/dates in the text with the variables that I have. For the date on the project, I don’t want to see someone’s birthday next year as an item I need to action now, so I set a defer date to Date -21d, which reveals the project 21 days before the individual’s birthday.

    When done, it uses the “Add TaskPaper” action using the Text just created. In the instance of this Birthday shortcut, I want all shortcuts to go into Family : Birthdays, so I select Folder in the action and then put the folder name as detailed above.

    When running the shortcut, you get prompted in the order of the shortcut, so name and then birthday date. Thats it. The project is added to OmniFocus in the correct folder, and if it is more than 21 days away, it is deferred and only shows up when needed.

    I can then repeat adding people with the short cut as needed.

    Apple Shortcuts is extremely useful when you want to reduce the time it takes to create identical projects. Please post any questions, and I’ll help where needed.

  • How to Ignore Files with Git that Have Already been Committed

    After setting up the beginnings of the chess game in my IDE I found that there were a lot of files that I accidentally committed but did not need committing as they were related to the IDE. The others in the group are using different IDE’s and have no need to see those files related to my IDE. Adding the folders to .gitignore wasn’t enough to remove what was already committed and pushed to GitHub.

    After searching around StackOverflow I came across this post which pointed me in the right direction. I ended up using the command suggested by Nate in response to the accepted answer. I’m not keen on copying/pasting but figured that since I won’t be pushing any updates until I see it works then this will be fine. If everything broke, I could just re-clone the project.

    The command I used:

    git ls-files -i -z --exclude-from=.gitignore | xargs -0 git rm --cached
    
    (more…)
  • How to Host a Jekyll Site on Amazon S3 and CloudFront

    This post is part of a series. You can find the previous parts about setting up Jekyll, transferring a domain name from Godaddy to Amazon Route 53, and how to theme a Jekyll site.

    If you have followed along from the earlier posts you will have a website running locally using Jekyll. You will also have themed your website to make it look like you want it. The next step is to push the website to a web host so that the world can see it. Note that this series of tutorials is for those with a fairly new blog who are not interested in matching permalinks to a previous website. If you need to 301 content and have more friendly URL’s then more configuration is needed on Jekyll. I won’t cover this here just yet, but might in the near future.

    In this guide I intend to show you how I deployed a static website on Amazon and enabled my domain name to be used on it. Because we only deal with html and Javascript, we can use the basic S3 static website hosting from Amazon Web Services.

    Why Amazon?

    The reason I selected Amazon was because of using many other hosts in the past such as MediaTemple (where this site was prior to the move to Amazon), WebSynthesis (where my DevFright.com blog is), PowerVPS, RackSpace, Rochen, Blue Host, Host Gator, Linode, Digital Ocean to name a few. I wanted to try Amazon so I could see first hand how that performed. I was also intrigued on how they charge for hosting there. Unlike a mostly flat fee of the ones mentioned above, I wanted to see what it actually costs to run a blog when I pay for what I use rather than pay up front.

    One thing to note as well is that I have all my blog content locally, and can switch hosting providers within an hour if needed.

    Setting up a Website on Amazon

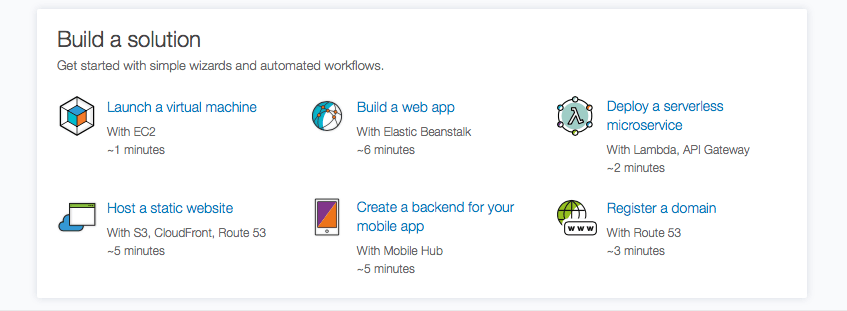
    Amazon makes it really simple to setup a website with them. To do this, visit Amazon Web Services and login with your Amazon account (or create an account if you don’t use Amazon). When logged in you will see an option in the "Build a solution" section called "Host a static website". Select this option as below:
    Click on the + New website button. You can’t miss it.

    Give your website a name. I just put mine as Matthew Newill Blog. I opted for the example website and then clicked "Create Website".

    The website is set up and you are given a sub domain to use. Of course, you might and probably will want to use your own domain. Lets set that up next. If you are running a live blog and don’t want any downtime I suggest you do this step last and just work with the provided sub domain until you are happy that everything is set up as you want it.

    Transferring a Domain to Route 53

    I transferred my domain name from Godaddy to Route 53. To do this I first needed to unlock the domain at Godaddy so that a transfer request could be made. You do this by logging in to GoDaddy and then going to the option to manage your domains. You then select your domain (the checkbox next to it) and at the top you’ll see a "Lock" button. Click on this and switch the lock off.

    Then select the domain name so you can see its details. In that screen scroll to the bottom and select "Email my code" next to the Authorisation Code heading. A code will be sent to you. Hold on to this.

    Log in to AWS and go to Route 53. Select the option (link just above where you register a domain) and click "Transfer your existing domains". If you have unlocked your domain you should be able to just proceed to transfer to Route 53. At some point you need your authorisation code. To speed up the transfer, this is what I did on Godaddy.

    When the transfer is completed (it may take a few days if you are unable to speed up the process as above) then go back to the website you just created on the previous step. Click on "Buy Domain" and on the next screen, choose an existing domain. Click on "Associate Domain".
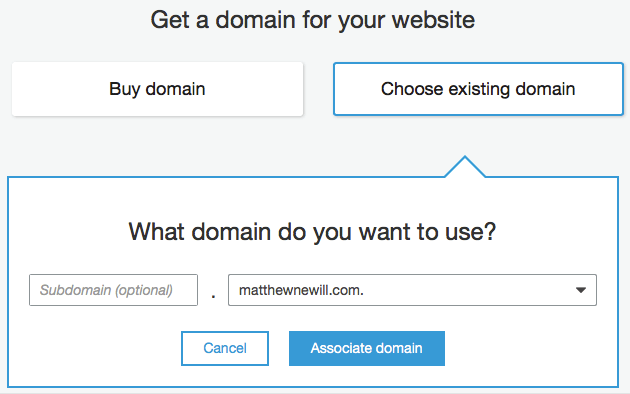
    At this point, you need to wait about 15 minutes for the process to complete which associates your domain with your website.

    Configure the Content Delivery Network

    Now that you can load up your empty website in the browser on your own domain name, lets take at look at configuring CloudFront. To do that, click on "Manage settings in Amazon CloudFront".

    In the general tab I clicked Edit and then added my domain name to the "Alternate Domain Names (CNAMEs) section. I also switched to HTTP/2, HTTP/1.1, HTTP/1.0.

    When done, CloudFront is ready although you can make other alterations as needed. For example, I created an SSL certificate and added that in the CloudFront general settings tab.

    Transferring Your Jekyll Site to Amazon

    At this point, you could build your Jekyll site and then upload the site folder in to Amazon S3. Thankfully though, someone has created a tool that can push your site to S3 by issuing a terminal command. The setup takes a few minutes, but once done, you just need the command "s3_website push" to push any changed content to Amazon S3.

    Lets set everything up. Open terminal and get to the root of your Jekyll install. Install with:

    gem install s3_website

    You need to generate the config file next. Do that by issuing the following command:

    s3_website cfg create

    A new file called s3_website.yml will appear at the root of your Jekyll install. Open this in your text editor of choice.

    At the top you will see some items that need configuring such as the S3 ID, secret, bucket and cloud front distribution. This information acts somewhat like (but not really like) a username and password so that it can get content in to your S3 bucket. It also highlights where to put that information. If you generate an id and secret that is granted access to the bucket and CloudFront distribution, then s3_website will be able to upload your content.

    To get this information, visit the aws console and login. Search for IAM and load it up.

    On the left sidebar, select Users and then click the blue button called Add user.

    Provide a username, and then select "programmatic access".

    Click Next to get to the permissions.

    Select "Attach existing policies directly".

    Search for AmazonS3FullAccess and add it. Then search for CloudFront and add CloudFrontFullAccess. Be warned here that this gives this particular user access to all S3 buckets and the CloudFront console. For me, this is OK right now because this is all I have in my account, but please do be careful when granting access here.

    Copy the Access key ID in to the s3_website.yml file and then copy the secret access key in to the same file.

    Go back to the main view in the AWS console and load up S3. Here, you need to find your S3 bucket name for your website. It will be in the format of: awe-website-yourfriendlyname-xxxxx

    Paste that in to the config file.

    Finally, you need the CloudFront distribution ID. You get this by going to your static website settings, selecting your site, clicking "Manage settings in Amazon CloudFront" and then at the top of the page you will see:

    CloudFront Distributions > EXXXXXXXXXXXXXX

    Save the config file.

    In the terminal run the following command:

    s3_website cfg apply

    If all OK, read on to find instruction on how to push the website to Amazon.

    Uploading Your Website

    Now that everything is confirmed and validated as working, it’s time to issue the correct comments.

    Issue:

    jekyll build

    Check for errors. If all OK, issue:

    s3_website push

    Wait a few moments and when complete, load up your website at yourdomain in the browser to see if all works. If so, well done! You now have a fully working Jekyll install that you can push to the internet.

    Each time you write a new post you need to build it and then push it. If you are more wise than I am, you might also want to test the site locally before pushing to ensure that all works well.
  • Changing the Theme on Jekyll

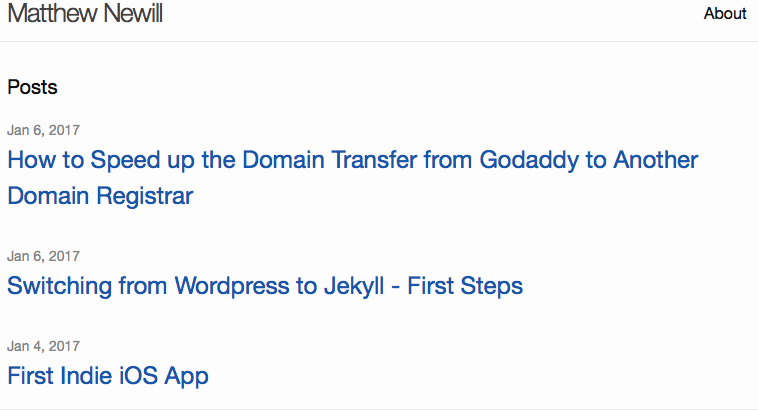
    Since starting to using Jekyll on this blog I have been using the standard built in theme. If you have visited before you will have seen the blog looked like this:

    The standard theme isn’t quite what I want this blog to look like. I personally prefer a few posts on the home page with full content enabled. I may at some point use the equivalent of the "more" tag so I can put an excerpt on the home page and then link to the full material, but for now I want to stick with the full content on the main page.

    To make the change I needed to install a new theme. This is the first time I’ve used Jekyll, so I was also new at installing themes.

    After a brief search around the Jekyll theme library I came across a theme called Lanyon. This is the one that I decided to modify and use.

    How to Switch Theme on Jekyll

    Before you begin, I suggest making a backup of your Jekyll folder. I used Git and committed everything before messing with the theme, that way I could switch back to where I was if needed. You might opt to simply make a copy of the folder. I’ll leave that up to you. However, in the next post I will show how I use Git and GitHub for version control on the site.

    Installing the theme was fairly simple. I ran in to an issue with pagination, but also found the fix after some searching around. Here’s how I installed it:

    I downloaded the Lanyon theme, extracted the contents and then folder by folder and file by file I pasted everything in to my Jekyll install being careful not to overwrite anything (such as the _posts folder… do not overwrite your own blog content).

    I deleted index.md (the original index file) as there was an index.html file included with Lanyon.

    The next step is to edit the config file. I commented out the old theme and added the following:

    # theme: minima
    gems:

    • jekyll-feed
    • jekyll-sitemap
      gems: [jekyll-paginate-v2]

    pagination:
    enabled: true
    per_page: 5
    collection: ‘posts’
    limit: 0
    sort_reverse: true
    sort_field: ‘date’

    Here I specified jekyll-paginate-v2 as one of the gems to be used. Note that I used v2 as I had problems with jekyll-paginate. From my understanding, jekyll-paginate development has been discontinued. V2 seems to build on the original.

    Next, I set the pagination options. I set enabled to true, per_page to 5 on "posts" only. The limit of 0 I believe means that all posts on my index.html page will be paginated and it won’t restrict it to the first XX amount of posts for example.

    The sort_reverse had me confused. I expected it to be needed as false, but for me the correct order was true. I also specified the sort_field to be based on the date of the post. You can sort by others such as title, author, and others if needed.

    After getting the main config file ready I also needed to add the following to the gemfile file:

    gem "jekyll-paginate-v2"

    You can now build your site and run it on the local test server on localhost:4000 as follows:

    jekyll build
    bundle exec jekyll serve

    At this point you should see the Lanyon theme with your own content (assuming you didn’t wipe out your _posts folder).

    Customising Lanyon

    I made a few more tweaks to make it my own. I’m not particularly interested in the slide out menu from the side. Instead, I’ll add a single nav bar below my name which will run the width of the page. To remove the sidebar I modified default.html found in the _layouts folder. I also made some tweaks to the _includes folder as well as the other files in _layouts just to get the site looking the way I wanted.

    After removing a few items I managed to get the site to look as I want it. I built the site and all looked good.

    Next Steps

    The next step is to move the blog to the internet for hosting. I chose Amazon to host the site and will go in to details of how I set that up in the next post.

  • How to Speed up the Domain Transfer from Godaddy to Another Domain Registrar

    Yesterday I started the process to move matthewnewill.com from Godaddy to Amazon Route 53. I went through the process of unlocking the domain at Godaddy, getting an authorisation code from them, and then starting the transfer steps in Route 53. All went fairly smoothly (except a billing issue where my card had just expired a few days ago).

    When the billing issue was resolved (only took a few minutes), the transfer proceeded to step 7 in Amazon which is Waiting for the current registrar to complete the transfer (step 7 of 14). Godaddy sent an email yesterday saying:

    If you wish to cancel, or did not request this transfer, log in to your account before 09 January 2017 by clicking the button below to decline the transfer.

    I wanted things to go quicker than the 9th January, so I did some Google searches and found a tip that suggested you go in to Godaddy and accept the transfer manually. I did that and about 2 minutes later I got an email from Amazon saying the domain transfer was complete.

    How to Manually Approve a Domain Transfer in Godaddy

    To manually approve a domain transfer in Godaddy you login, go to Manage My Domains. At the top left, click on Domains and then Transfers.

    You should see your domain name listed under "Pending Transfers Out". Click the checkmark, and then click on the Accept/Decline button. Select the correct option to accept the transfer.

    What Next?

    Just wait. When you complete this step in Godaddy it expedites the domain transfer. The instructions I read indicated it could be about 24 hours before it happens which is far better than waiting a few days. However, for me it was just a couple of minutes.

  • Switching from WordPress to Jekyll – First Steps

    I wanted to switch from WordPress to Jekyll on this blog. I first started using WordPress on May 17, 2006 on another blog and have since used it regularly, and for a period of time between 2009 and 2011 I posted multiple times a day. Since starting this new blog several weeks ago I came across a handful of sites that use Jekyll. After a bit of study I decided it was time to test it out. With this being a fairly simple blog that is mostly lots of text and sometimes an image or 2, I decided it would be a good fit, or at least I think it will be a good fit.

    What I will Cover

    I will be walking you through how I installed Jekyll on my iMac. I will also be explaining what does what in Jekyll although it will be a very basic tutorial on how to publish a post and test the site locally.

    What I won’t cover is more in-depth things such as permalinks, themes etc… although I will at a later date.

    Requirements

    The requirements are extremely basic to run a Jekyll website. Jekyll is installed locally. You write your content locally in Markdown. You build the site. It spits out a static website in html and you then upload that to a web server of your choice. There is no database and no need for anything fancy to be installed on the server.

    The Process

    After finally getting to grips with how Jekyll works I decided that I need to create a new workflow to make the transition worth it. In WordPress it’s quite simple. I can log in from any browser, click New Post, write, publish, and be done. With Jekyll there’s a few more steps involved that all seemed a little complicated when I first came across them. Now that I have Jekyll installed I actually find it’s quite simple to use and quick to update.

    What I am Using

    In this post today I want to just show what I am using locally. In my next post I’ll write about what I am doing to get that content to a server and where that server is located.

    Locally I use the following:

    • Jekyll (as expected). This powers the website.
    • iA Writer. Used to write my content. I use this on macOS and iOS. You can use any text editor that you want. I just like this particular one at the moment. If I want to switch to another, that’s no problem because markdown is just text.
    • DropBox. I store my blog in a DropBox folder as it works well for syncing to my iOS devices and my MacBook.
    • Git. I use Git for tracking the changes made. My plan is to commit each successful build and send to GitHub. That way, if I am making large modifications and mess it up, I can just step back and start from where the site was working previously.

    I might consider TextExpander in the future which I think will be helpful for some common text such as the front matter, code snippets, etc… but I haven’t ever used it and don’t even know if it’s compatible with iA Writer. It isn’t too important to me in the first stages.

    Installing Jekyll

    The instructions are simple to follow on the Jekyll website. I just followed the quick start instructions on the main page. To do that, open Terminal and navigate to the folder where you want to add your new blog to. In my case I entered

    cd dropbox
    cd apps

    Install Jekyll by entering (note that this command isn’t related to the ones above… you can install Jekyll as soon as you open terminal).

    gem install jekyll bundler

    Next you generate a new site by entering:

    jekyll new websitename

    In my case I called it MatthewNewillBlog so that I can identify it.

    When this is done it runs through the process of building the site. When done:

    cd matthewnewillblog

    To test it’s working enter:

    bundle exec jekyll serve

    Then open a web browser and go to http://localhost:4000

    You will see a basic website running now.

    Configuring Jekyll

    The main configuration file for Jekyll is called _config.yml found in the root of the Jekyll install. Open this with your favourite text editor. To do this I opened the finder, navigated to my Jekyll install, opened the file with Textastic.

    There are a few items to modify in here. You can give the site a title, an email, a description, as well as a URL. There are also some build settings which I haven’t modified just yet.

    After making the changes, save.

    To see those changes we need to rebuild the site. The command for that is (make sure you ctrl-c if the server is still running):

    jekyll build

    When it completes you can start up the server again with:

    bundle exec jekyll serve

    When the server is started, reload the website. You should see your changes reflected on the page.

    Structure

    The basic structure of Jekyll is that you have a _posts folder and a _site folder. _posts is where you content is put that you want to go live on your site. The _site folder is generated automatically when you used the ‘jekyll build’ command. The contents of this folder are what you upload to your webserver after building the site.

    Creating a New Post

    Creating a new post can either be done in a _drafts folder, or you can create it in the _posts folder. If you use the _posts folder, just be aware that you might end up publishing a half baked post if you do a rebuild and sync the _site folder, so be careful with that option. For example, you might start working on a post, add the front matter, forget about the half finished post and leave it there and create something new. On your next build you may upload half a post that wasn’t intended for the blog. Be careful!

    Open your text editor and create a new file. The filename needs to be in a specific format which is:

    YEAR-MONTH-DAY-post-title.md

    If I want to publish a post with todays date that would become (my-post-title is what I want to call it. I guess that would be classed as the post slug in WordPress):

    2017-01-06-my-post-title.md

    When the text file is created you then need to create front matter in YAML as a block at the top. The front matter block for this post looks like this:

    layout: post
    title: "Switching from WordPress to Jekyll – First Steps"
    comments: false
    date: 2017-01-06 11:12:32

    It starts and ends with 3 dashes. The in between parts provide some needed information such as it uses a post layout, has no comments, and has a title. The date/time is in the following format:

    YYYY-MM-DD HH:MM:SS +/-TTTT

    The time and offset are optional. If you post a few times a day it could be worth specifying the time. I do just because it’s easy enough to do although I don’t use an offset.

    More details about Front Matter can be found here.

    When the front matter is in place, you can now write your blog post. You write in markdown or HTML. I am fairly new to markdown so won’t try give a tutorial on how it works. All I am doing is starting with the basics such as creating links and using bold text. Because my previous posts had some HTML for images, I just left those as they were, but there is syntax in markdown to specify images. You can read about all of what markdown can do over here.

    Publishing your new Post

    Now that your content is written and you are ready to publish, it’s time to test.

    If your post isn’t already in the _posts folder, move it there.

    In terminal navigate to the new blog folder.

    Run the following command:

    jekyll build // Note that you probably don’t need to ctrl+c from the server as it seems to build automatically on the fly… but if you don’t see changes then I suggest rebuilding.

    Followed by:

    bundle exec jekyll serve

    When you load up the website at localhost:4000 you should now see your new post. Note that you will also see another post which was automatically put there when you installed Jekyll. To remove that, just delete it from the _posts folder and rebuild your site. I hope that by testing doing this that you will see how easy it is to manage your Jekyll install.

    In the next post I’ll explain how the theme can be changed and how you can change the structure of your website. After we have the website looking good on the local server I’ll move on to explain how to put the site on to a webserver.

  • iMac 27 Inch Mid 2010 SSD Upgrade

    I purchased my iMac in 2010; I opted for the lowest spec model. A year after buying it I upgraded the RAM from 4GB to 16GB and about a year after that I had to replace a faulty hard drive. Apple recalled the original drive due to a fault in the firmware on the drive, I ignored the product recall and then found I had to replace it when it broke just out of that recall window.

    After 6 years and several OS updates, the old spinning disk just wasn’t cutting it anymore. I didn’t want to pay over £1,000 for a new iMac so instead I went the route of upgrading the hard drive to an SSD.

    Rather than me explain how to take apart a mid 2010 27 inch iMac and upgrade to an SSD, I thought I’d just share with you the items I purchased so that you can see what worked for me. I spent hours trying to decide what would work and what would not. The full iFixit guide should be sufficient for you once you have chosen the drive and adapter that you will use. One of the options could be to leave the HD where it is and then use the optical drive area for the SSD. My optical drive broke years ago, but I just left it where it was this time around.

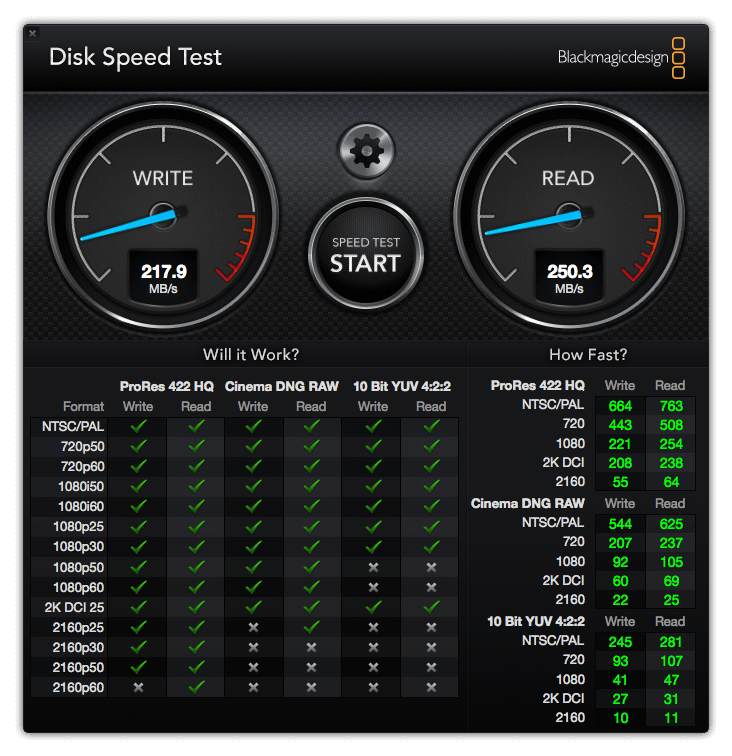
    The drive I selected was the Crucial MX300 1TB SSD. The MX300 is a SATA 6.0Gb/s device although this particular iMac (the mid 2010) works on an older SATA standard at 3.0Gb/s. The reason I went for this was so that when I do get rid of my iMac and upgrade, I can keep the SSD and use it elsewhere in a machine that can use it to its full potential. The downside is that I won’t get to use the SSD to its fullest potential in this machine. In fact, the fastest it will work is at the 3.0Gb/s standard. But don’t worry, you won’t regret the upgrade once performed; it’s super quick.

    I purchased my 1TB SSD from Amazon in the UK and paid around £230 for it. Here is the drive that I ordered. The same model can be found on the US Amazon store here. It is priced at $244.43 at the time of writing this.

    The Crucial MX300 is a 2.5″ drive, but the iMac uses a 3.5 inch hard drive. I am sure you could probably secure the drive by some other means, but I purchased a 2.5″ to 3.5″ AdaptaDrive from NewerTechnology, again on Amazon. This worked perfectly for what I needed. The Amazon US store sells it here.

    One optional item that I chose not to buy but might do at a later date is a temperature sensor. I haven’t tested this cable, but have read reports that others have and that it works well. It is available on Amazon UK here, and Amazon US here. Instead, I just wrapped the old sensor around the frame to keep it from dropping down behind the circuit board(s).

    Instead of using a temperature sensor I downloaded an app called SSD Fan Control which allows me to select SMART for the hard disk which appears to use the temp sensor built in to the drive. The only downsides that I have come across so far are that when the Mac is rebooted, the fan will spin at full speed until SSD Fan Control starts up. From a cold boot it does not spin up as the overall temperature is lower. Also the fan was on full speed for the duration of the operating system reload.

    I may purchase a temp sensor in the near future, but so far all appears to be running just fine without it.

    The only other items you need are the following:

    1. A good backup of your files. I use BackBlaze and Time Machine. Although BackBlaze is a paid server at $50/year, I find it invaluable as when my first hard drive failed (my fault), I had a 600GB or so backup that I could download and use.
      2.You will need the correct screwdriver(s); T10 Torx screws are used as well as T8 Torx for the drive. A precision screwdriver set typically contains these. One option is this one from Amazon in the UK with this option for Amazon in the US.

    2. Suction cups are needed to remove the glass on the front of the iMac. iFixit shows that you need 2, one for the top left and one for the top right. I’ll whisper this as I’m sure this isn’t recommended, but I used one of the kids bath toys with suction cups on the back. It worked just fine. It just needs to be strong enough to overpower the magnets that hold the glass in place.

    If you have all the items above, you are ready to upgrade to an SSD. After I installed Sierra when all came back up, I installed the SSD Fan Control app, and also Disk Sensei. I enabled Trim but if I am honest, I do not know if this is needed or required. I did read that if the drive supports Trim then it will be just fine and if not, I’ll just need to disable it. After a few weeks of running my iMac with this SSD and Trim enabled, I’ve had no problems at all.

    Is the iMac 27 inch Mid 2010 Quicker with an SSD?

    I have to say that my iMac feels like a new machine when I now use the SSD. Of course, the processor is still from 2010, but the disk is far newer and when it was a spinning disk previously, it was so sluggish. It would take a good 30 minutes to reboot and settle down clicking away that it became frustrating to even power it off. Now that it runs an SSD I can be up and running within a minute or 2. From my understanding, the drive works at half the speed of its potential due to the 2010 iMac using the old SATA standard, but the speed increase is great and I no longer have apps freeze while the hard drive churns away in what seems like an endless shuffling of files.

  • Creating my First Static Library in Xcode

    After learning to program for a couple of years and even posting some tutorials of my own of things I learned along the way, I figured it’s time that I start putting some work out there both in the app store and for developers to use.

    I work primarily with Xcode and enjoy designing and creating apps for the iPhone and iPad the first of which is has been released and in the app store (I’ll blog about that later) and the second one should be in the app store by the end of this month (April 2014).

    The time has now come that I share some of the work with companies and because this is for a company I did some work for, I’ve been asked to put it in to a static library. Although I’ve made use of static libraries and plenty of frameworks in my code, up till this week I hadn’t created my own work and put it in a static library.

    After a bit of digging around, I came across this handy tutorial by the team at RayWenderlich.com. The tutorial covers how to create a static library and also includes a few extras such as some code and instruction on how to make the library universal so that developers can use it to both test on devices and to test in the simulator.

    The main reason I opted for a static library was because of this comment on the RW site (linked above):

    You’d like to share a library with a number of people, but not allow them to see your code.

    With this being for business purposes, the code is required to be locked up for now.

    Although I haven’t quite finished creating the static library, I have done some testing and followed the tutorial above and found its relatively easy to implement. There’s a few Xcode quirks along the way such as re-importing a newer version causing 2 sets of paths to be searched for and creating warnings. Also, you also might find you need to remove the headers from the target and add them back in to reset everything back up to avoid errors. Finally, when building the static library, remember to specify what headers you want exposing when you create the universal library. You do this in the “Copy Files” section of “Build Phases” for the target.

    After a few small speed bumps, I think I’m almost there creating the library.

  • How to Keep Your PC Safe and Secure

    For almost 20 years I tend to have been the go-to guy when people run in to software problems with their PC. Along that journey I have fixed a number of computers and helped bring them back up to speed and make them safe and secure.

    The purpose of this post is to share with you the tools that I regularly use as well as the best practices that I have found relating to being secure when online.

    This post is not a step-by-step way to clean an already infected and slow machine. Instead, these ideas are presented to help you be secure so that you avoid being infected by a virus or be the victim of a phishing scam.

    Use OpenDNS

    OpenDNS is a free service that is designed to protect your home network. There is no software to install for OpenDNS. Instead, you make a small configuration change on your router which means that any device connected to it wired or wirelessly will be protected from various websites which includes adult themed as well as sites aimed to steal information from you or install a virus on your PC.

    There are two free options when signing up for OpenDNS. The first is OpenDNS Home which aims to make browsing the web faster, give parental controls to parents for children and provide phishing protection and identity theft protection. The second option is called OpenDNS Family Shield which does all that the Home service does but adds in blocks to adult websites.

    Lets take a look at what OpenDNS does in more detail. Note that there may be other similar services. I just happen to like OpenDNS because it’s free and works well. If you know of another DNS service aimed to protect a PC then feel free to post a mini review in the comments below.

    Blocking Websites and Phishing/ID Theft Attempts

    The biggest risk you have when being connected to the internet are emails that you receive which appear to be from banks, Paypal, popular shopping sites like eBay, Amazon and even friends as well as websites that you visit that carry a virus or malware. OpenDNS attempts to tackle both these problems by keeping a 24/7 updated list of problem sites. With you installing OpenDNS on a router, the service automatically intercepts any call to a webpage that might be bad and serves you a warning page instead. This alone is a great way to stop malware or a virus from attacking your PC.

    One of the services included for free with OpenDNS is Phishing Protection. Phishing is the term used where someone sends you a fake email from your bank and entices you to click through to a fake website and log in to your bank. Essentially, because the email is fake and it has sent you to an identical (but fake) website, you are not logging in to an online bank but instead are simply providing your username and password to someone else so that they can log in and have full access to your bank account. The same applies for PayPal, Amazon, eBay and many other services that are connected to your bank card. Although accessing your account just to steal money is mentioned above, it isn’t the only reason. Some fake bank emails just want you to visit a webpage so that your PC is infected with malware which can then use your PC to launch an attack on another system or steel files and all your keystrokes so they can get a lot more information from you.

    The built in phishing service attempts to block these sorts of websites. It is backed by a company called PhishTank who collect real time information about scams and phishing attempts and add the bad websites to a block list. OpenDNS utilises this block list and if you click on a link, you should be lucky and see a warning telling you to go back. This service also blocks other forms of identity theft.

    One bit of extra advice I’ll give here is that if your bank emails and gives you a link to log in and read something or check an option, do not use the link. Instead just go to the web browser and load up the webpage by typing in the URL (or using a book mark). If the message is important enough then after logging in, it will be presented to you. Do not click links in emails to Paypal, Amazon or your online bank unless you know for sure that it came from one of those organisations.

    Windows Updates – Keeping your PC Patched

    Moving on, the next subject is Windows Updates. One thing I regularly see when fixing friends PCs is the amount of Windows Updates that need to be installed. I’ve seen some cases where none were installed other than perhaps SP1 which came with the operating system. Windows Updates are easy to install on whatever Windows operating system you use. Assuming you have XP or above because Windows 2000/ME and older no longer qualify for security updates.

    Make sure that you go to the control panel and Windows Updates and set them to be automatically installed when available. After doing that, run the Windows Update from the Start menu to make sure you are current with your updates. Installing updates will ensure that you are patched from all the known vulnerabilities. When I say updates, I mean all critical updates such as service packs and other individual updates.

    Software Updates

    As well as Windows Updates, it is worth also checking updates for all of your software. The majority of software has a link, usually within the Help menu, that allows you to check for updates. Office occasionally gets updated to fix vulnerabilities in Outlook as well as other software. Keeping your software current helps prevent malicious attacks from hitting your PC.

    I mentioned software updates here. With that, always make sure you are running one of the latest supported web browser. I recommend Chrome or Firefox and then when you are notified an update is available, install it. Using an out of date browser is a high risk as a number of scripting type attacks can be done which will allow unwanted software to be installed. By using the latest versions of your browser, you help prevent malicious websites from installing software you don’t want. That is of course if OpenDNS hasn’t already prevented this from happening. Either way, it’s still best to use the latest software and even more so when it comes down to the web browser.

    Virus Scanners

    Installing a virus scanner is usually mandatory for most people. I know a few who don’t use virus scanners as they are experienced in noticing and quickly fixing issues, but for the 99.9% of the rest of PC users, this is pretty much a given. Luckily there are some free options out there from the likes of AVG which will provide some decent protection to your PC. Although you can prevent a large amount of attacks coming to you by implementing OpenDNS and running the latest software, there’s still a risk there. If AVG is updated regularly by the user, it provides another protective barrier and can prevent the virus being installed, thus saving paying out money for someone to help fix your PC.

    Malware Scanners

    Although you might not want to run a virus and a malware scanner on your PC, I always like to have a few around which includes MalwareBytes and Spybot. If I suspect visiting a bad site, then I’ll run a scan to see if anything was installed and then use the software to remove the malware.

    In Closing

    Keeping your PC clean can be achieved by the few simple steps above and with being a bit more observant.
    In summary, I’d like to remind you of the following:

    1. Use OpenDNS – It’s free and can help block phishing and id theft.
    2. Use Windows Update and set it to automatically run.
    3. Update all your software, most importantly Outlook (if you use it) and your web browser(s).
    4. Be careful when you open emails. Even though they might come from a friend, if the URL (link within) looks suspicious then don’t open it. If you do then hopefully OpenDNS blocks it or your virus scanner stops the effect. Ask yourself, why would my friend send me this email with little to no detail?
    5. If your bank or an online store emails you then be cautious. If you do think a link is genuine (which it likely isn’t) then make sure it takes you to the correct website. If Amazon it will be something like https://www.amazon.com and not https://www.myamazon.com or www.amazons.com.
    6. Install a virus scanner and have Malware scanners installed just in case.
    7. I’ll throw in this one as a bonus… use two-step authentication where available. Google uses this, Dropbox does and more and more services are transitioning over. Banks often use devices like the PINSentry from Barclays to make up a new password each time you log in.
  • How I Make my WordPress Blogs Run Faster

    Update 11 Jan 2021: This site is back on WordPress again.

    Update 21 Jan 2017: TechFright posts were merged in to MatthewNewill.com which runs on Jekyll. I also moved away from PowerVPS a few years ago and went with WebSynthesis for my other blog. I also use a shared MediaTemple account. Some of this content is now out of date.

    TechFright.com runs on a VPS server from PowerVPS at the moment. The blog runs alongside several of my other blogs which some are occasionally updated and another is regularly updated. Most get a little amount of traffic each month while others get several hundred visitors a month and one gets a few thousand visitors a day. I run on the fuse basic hosting package which costs $109/month (although I used a coupon to get something like 20 or 25% off of that). I use Centos 5.8 on that VPS which comes with WHM and cPanel. I have used Window hosting extensively before moving to Linux a few years ago but find Linux far easier to work with when using WordPress (for example, rewriting URLs is easier). But, go with what you find familiar.

    I want to keep my largest blog (a gadget blog) running as fast as possible with the cleanest code. To achieve this I go to what you might call extreme lengths to keep pages loading fast and WordPress working well. Here’s a few things that I have done to shave a few seconds off the page load speed.

    The Genesis Framework

    For a long time I was a big fan of the Thesis theme from DIY themes. Looking back through my emails, I purchased a developers licence in April 2008. Unfortunately, I just couldn’t get my site to look how I wanted it to look when wanting to redesign a few months ago, so I switched. I still think the Thesis framework works extremely well and still feel confident in using it from a technical standpoint. I can also manage hooks quite well now and customise the look of my websites, but unfortunately I just don’t have the skills to take the design to the next level and also found it difficult to find themes that I liked. For this reason I dropped Thesis in favour of the Genesis Framework. I did this because of the child themes that you can purchase for relatively cheap. The link just above there gives you a rundown of the technical aspect of Genesis.

    I currently use several themes which include Freelance, Magazine, Minimum (I like this one!!) and one called Sample. Price wise, the framework and 1 theme seems to cost $79.95 but when you buy that, you can use it on unlimited sites. You can then also buy child themes at a discount and they usually cost around $20, again they come standard with the unlimited option.

    Rather than messing with hooks, I tend to use the Genesis Simple Hooks plugin (for free) which allows you to paste PHP code in to the one of many hooks found in WordPress. I wont go in to the technicalities of using hooks instead of editing theme files, but in simple terms it prevents the need to modify the theme code making it easier to update your theme at a later date.

    The page load speed isn’t really recognisable with the Genesis Framework, but the reason I use it is because it is a good foundation for a blog and this is important.

    Replace Apache with Litespeed

    This is perhaps one of the best enhancements that my blog received. Apache is the standard install at PowerVPS but I had recently read about Litespeed as a replacement for Apache. At the moment I am running on a trial licence for the next 10 or so days and at that point I will decide if I am going to lease a licence for it or opt for another host such as VPS.net that supports Litespeed for a small cost.

    The benefits are amazing with Litespeed. As I’m running the trial version I only get to utilise 2 CPUs of the 8 on the VPS, but the page load speed has increased as has the waiting time for a page to be served. While running Apache I was seeing a pause of about 3 – 4 seconds with the waiting…. in the status bar at the bottom of the page. Switching to Litespeed the waiting time is now below a second and overall, the blog and the admin area run a lot smoother.

    I recommend trying Litespeed. It is quiet easy to install and I’ll do a tutorial on it at a later date for those who want to install it themselves.

    W3 Total Cache

    Caching is essential for almost all blogs. WordPress is quiet heavy in terms of how many requests are made to the database and how much PHP is needed to render every single page. Although a blog with modest traffic wont struggle without caching you’ll find that if you write something that hits Stumbleupon or gets linked to from a large blog, the blog will fall on its knees. So, install W3 Total Cache.

    What it does is caches pages to either disk or some sort of memory cache like xcache or memcached. When a visitor hits the page for the first time, it renders the page the normal way by querying the database and pulling the images from the disk. The next time a visitor hits that same page, they get served a page from the cache. With pages and posts loading from RAM with Xcache, APC or memcached, it speeds up things a lot and takes load off the CPUs, doesn’t use as many concurrent connections to the MySQL database and doesn’t do much PHP scripting at all. A huge saving for a server. When hundreds of people descend on your post the server can generally handle it with W3 Total Cache because of the load being taken off the server.

    You can also use W3 Total Cache to combine CSS and JS files with Minify as well as do Object caching, Browser caching and database caching (I recommend using some sort of memory cache rather than disk caching for database).

    Memcached, APC or Xcache

    Although caching to disk with W3 Total Cache is possible (there’s a basic and enhanced version), there are several free options that can be installed which as Memcached, APC and Xcache (there are a few others mentioned). Installing one of these is the better way to run caching because it takes the strain off the disk and puts it in to RAM. RAM is far quicker than a regular hard drive, so performance is also a notch higher with these. I’ll also do a post at a later date on how to install Memcached. Although WHM can do some of the installations with the click of a mouse, each of them still require you to edit php.ini to configure them the best way.

    Use MaxCDN to Push Images, Theme files, CSS and JS across Continents

    Because of how the internet works, the further you are away from a server the longer it takes to get the content to you. Adding a few milliseconds per packet of data soon adds up with a homepage that might be 2.5MB in size. A CDN (Content Delivery Network) aims to tackle that problem by placing servers in busy internet areas around the world. I opted for MaxCDN.com partly due to the price but also because of the good reviews and coverage.

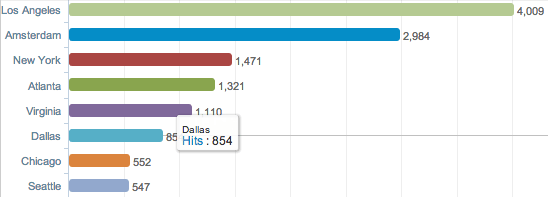
    By putting multiple servers around the world and having your blog push content to those servers, it allows someone in Seattle to load up most parts of your website from a server close by to Seatle. Likewise, if someone in the Netherlands loads up your website, a copy of most of the content is pushed on to a CDN server in the Netherlands and they load your site up as though they were local to the server. This cuts down a lot of transport time. Price wise, 1TB of traffic is valid for a single year at costs just $39.95. That low cost and high amount of traffic more than compensates due to the better experience your visitors get. If you run ads, you’ll likely also see revenues increase as well. In my experience, the quicker the page load time, the better the conversion because people like fast loading websites.

    With MaxCDN and W3 Total Cache, the service is simple to set up and can be fully configured within an hour of purchasing the service. You also get the added benefit of setting up different domain names for the cdn so that you can have cdn1.yourdomain.com, cdn2.youdomain.com, cdn3.yourdomain.com. The reason you do this is because it spreads images, JS and CSS files around the different host names and speeds up page load. Typically a browser will only load 5 – 8 items at the same time from a single host name. If you have 40 images to download on your page, it will only do them in batches of 5 or so. If you run multiple hostnames it allows several blocks of 5 items to be downloaded simultaneously, thus loading the page faster.

    Use the Smush.it plugin to Squash Image File Sizes

    A lot of images you will upload will not be as small as they could be. Depending on where you get the images from you might see some that are far bigger than they need to be (referring to file size). Installing a plugin like Smush.it allows you to automatically smush images with a lossless tool. What that means is that your image filesize might end up being 10% to 90% smaller but yet, look identical. Lossless means it doesn’t lose any clarity when being compressed.

    If you have an image heavy site, run the images through smush.it to cut down filesize. This of course means that a user has a lot less to download, and therefore the page will load quicker.

    I also recommend grabbing all your theme images and running them through the smush.it tool linked above.

    In Closing

    Although each step only shaves a bit here and a bit there, it’s the combination of all these things that can make a site load in 2 seconds as opposed to 8 second. It’s difficult to put them in priority order because they each do something different, but my loose order would be caching, Litespeed, MaxCDN followed by smushit.

    Do you have any other advice on what will help speed up a website? Post your ideas in the comments below.